Your wishlist is empty.
Secure Payment
30 days return

You're standing in the hallway with a tall canvas still in its packaging, holding it against the wall while the console table behind you looks completely disconnected. Online, the piece looked elegant and architectural. In your room, it looks skinny, stranded, and somehow too high.
That reaction usually comes from one of two mistakes. The artwork is too small for the wall surface, or the vertical format doesn't suit the architecture in the first place. Hanging height matters, but proportion decides whether canvas wall art vertical looks intentional or accidental.
The wall art market is already a substantial international category. It's projected to reach USD 99.15 billion by 2033, up from USD 61.01 billion in 2025, with ready-to-install décor and e-commerce expansion cited as major drivers by Grand View Research's wall art market report. Canvas is especially relevant, accounting for 45.11% of wall art market share in a 2026 market report, also cited in that research.
So there's no shortage of tall canvas options. The problem is choosing one that has enough visual weight for your actual wall. Here's how to stop guessing.
You hold the canvas against the wall, step back, and immediately see the problem. The artwork is tall, the subject looks right, yet the room makes it seem thin and stranded. That usually comes from choosing the canvas dimensions before judging the wall.
A vertical piece can have plenty of height and still look undersized because its width does not relate to the console, sofa, headboard, or open wall around it. The mistake is especially common with canvas wall art vertical, where shoppers focus on the dramatic proportions shown in a product photograph.
Stand across the room and ignore the artwork's subject. Study only the rectangle. Does it hold the wall, or does it resemble a bookmark taped to it? If your eye goes straight to the empty space on both sides, the canvas is too narrow. Hanging it higher will not fix that.
Vertical format works naturally in a narrow entryway, beside a doorway, inside a stairwell, or above a slim console. These locations already provide a tall architectural setting. A single portrait-oriented canvas can reinforce that rhythm and make a tight passage feel deliberate rather than unfinished.
A wide wall demands more width from the arrangement. Above a long sofa, one vertical canvas often leaves too much unused space on either side. The artwork may be attractive, but the composition will feel incomplete. Choose a pair, a triptych, or a wider horizontal work when the furniture and wall extend broadly.
Canvas remains a common wall-art format. Grand View Research identifies it as the largest material or form factor in its cited 2026 market data, and The Business Research Company's wall decor report describes canvas as a leading format within wall art. That popularity fits practical interiors: canvas can fill narrow vertical spans, stair walls, hallway gaps, and furniture-backed spaces without the visual weight of a deep sculptural object.
Designer's rule: A vertical canvas does not earn its place by being tall. It earns its place by being wide enough to belong to the wall.
After the width works, set the artwork so its center sits at a comfortable viewing height. The practical gallery benchmark is 57 to 60 inches, or 145 to 152 cm, from the floor to the artwork's center, according to Rossetti Art's canvas hanging guide.
Measure from the floor to the top edge and the piece will usually end up too high. Tall canvases then float toward the ceiling, creating the exact disconnected effect you meant to avoid. Measure the canvas height, divide it by two, and account for the distance between the top edge and the hanging point. Mark the wall for the center, not for the top edge.
Above furniture, leave a modest gap so the canvas reads as part of the grouping below it. If the wall still feels broad and empty, widen the arrangement before raising the artwork. Proportion fixes the problem more reliably than height.
You do not need a designer's eye to size vertical canvas wall art. You need a tape measure, a pencil, and the discipline to measure the wall before buying the piece.
Start with width. Above furniture, use the furniture as the anchor. Artwork or a complete arrangement should occupy roughly two-thirds to three-quarters of the furniture width, following The DIY Playbook's wall art placement advice. On a blank wall, measure the usable span instead of the entire room. A canvas that looks substantial in a product photo can look timid against broad, empty drywall.
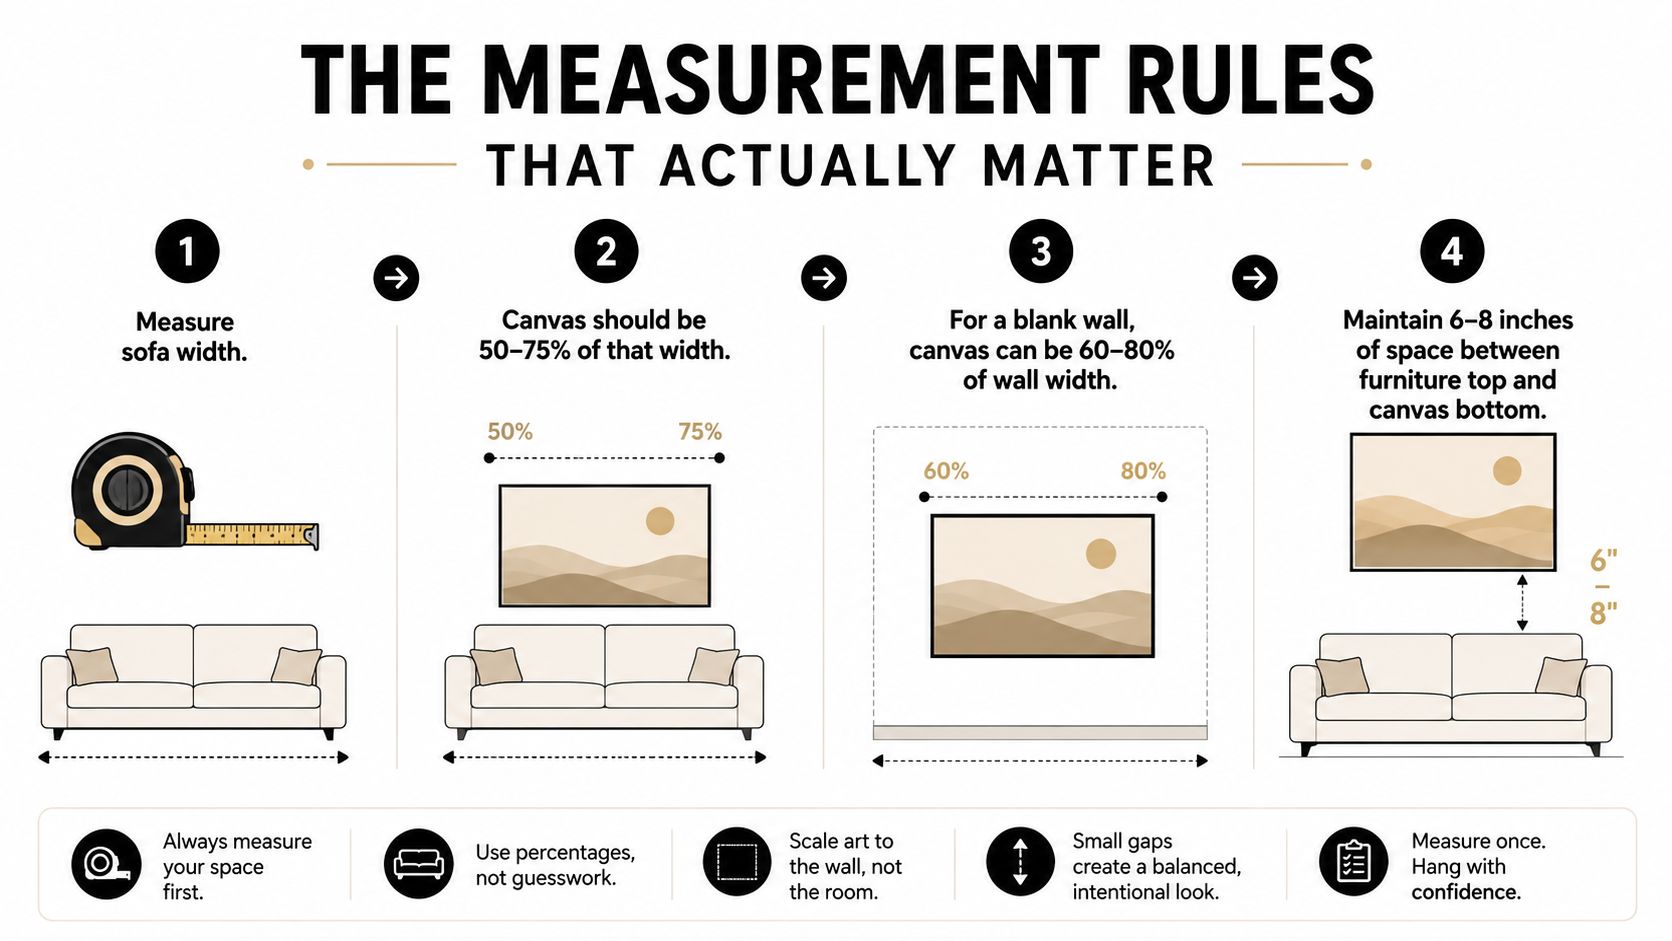
Measure the sofa, credenza, console, or headboard from outer edge to outer edge. Multiply that measurement by the proportion you want the art or full arrangement to occupy. If a single narrow canvas falls short, choose a wider format or add another piece. Raising the original will not solve a width problem.
For an unoccupied wall, measure the section between architectural interruptions, such as a doorway, window trim, or corner. Include only the area that can visually hold art. A canvas should belong to that zone rather than compete with features outside it.
Windows and doors need a separate check. Measure from the edge of the opening to the nearest corner or major furniture edge, then treat that distance as the available width. Leave clear breathing room around trim, handles, and switches. If the canvas overlaps those features visually, reduce its width or move the arrangement. This simple paper template test prevents a vertical piece from looking squeezed after installation.
For a free-hanging piece, place the center at 57 to 60 inches from the floor, the practical eye-level benchmark noted earlier. Divide the canvas height by two, then subtract the distance from the canvas top to the hook or wire's hanging point. The result marks the hardware position.
A vertical canvas does not automatically belong lower or higher because of its shape. Set the center for comfortable standing viewing, then check the surrounding proportions. Measuring from the floor to the top edge usually pushes the artwork too high, leaving the lower half disconnected from the room.
Above furniture, keep a modest gap between the artwork and the piece below it. If the wall still feels empty, widen the arrangement before raising the canvas. Scale fixes that problem more reliably than height.
Rooms with ceilings above 9 feet can make standard eye-level placement feel slightly low. One placement guideline recommends shifting artwork upward by about 2 to 3 inches for every additional foot of ceiling height above 9 feet, as reported in The DIY Playbook's placement guidance.
Use that only after confirming the width. A higher center cannot rescue a canvas that is too narrow. It can help a correctly scaled piece sit comfortably in a taller room.
Before drilling, check four points:
The doorway test catches errors a tape measure misses. If the canvas looks isolated from the room entrance, change the scale or grouping before making holes.
The layout must match the wall before the artwork matches your taste. A single tall canvas can look elegant in a narrow passage and undersized on a broad wall. The mistake is usually not the height. It is insufficient width and scale against the surrounding architecture or furniture.
Use a single vertical canvas for a narrow wall span, such as an entryway, the space beside a door, a gap between windows, or a slim stairwell section. Leave breathing room around it, but make sure the image has enough presence to register from the room entrance. On a broad wall, one slender piece often looks stranded.
A pair of matching verticals gives a wide sofa, credenza, or console more visual coverage without forcing one image into an awkwardly oversized format. Center the pair over the furniture, align their top edges or centers, and keep the gap consistent. The spacing should read as an intentional composition, not as two canvases pushed apart until they fit.
A triptych suits a tall wall with architectural movement. In a stairwell, three panels can follow the rise and break a long expanse into a sequence. Above a large dining wall, the format works when the subject gains interest through progression instead of one uninterrupted image. Keep the panels related in palette, subject, or frame finish so the breaks feel designed.
A gallery cluster gives you the widest range of scale. Choose it for a large dining room, landing, or broad living room wall where one tall image would feel too formal or too narrow. Combine portrait canvases with smaller shapes or framed works, then repeat at least one visual thread, such as a restrained palette, related subject matter, or consistent frame finish. Browse Jessie's Home's portrait canvas collection to compare vertical subjects before deciding whether one image or a coordinated grouping fits the wall.
| Layout | Best Wall Width | Min Ceiling Height | Spacing Between Pieces | Recommended When |
|---|---|---|---|---|
| Single vertical canvas | Narrow wall span | Any ceiling height | Not applicable | You need one clear architectural accent |
| Pair of verticals | Medium to wide furniture-backed wall | Standard or taller room | Keep the gap consistent and visually narrow | You want symmetry without one oversized image |
| Triptych | Tall wall or stairwell | Taller space preferred | Match the rhythm of the architecture | The wall benefits from sequence and movement |
| Gallery cluster | Broad blank wall | Any ceiling height | Maintain a consistent visual system | You want collected texture and flexibility |
For a narrow entryway, choose one commanding vertical canvas. For a wide living room wall, choose a pair unless the wall itself is unusually narrow. For a stairwell, use a triptych or a staggered series that follows the climb. On a large dining room wall, a gallery cluster will usually carry the width better than one skinny canvas.
Do not build a grouping around a canvas that is plainly too small. Return the wrong size if possible. A larger, better-proportioned single work looks cleaner than a forced arrangement built around a purchase you already regret.
A vertical canvas can follow the eye-level rule and still look wrong. The usual failure is scale against the wall, not height. Check the furniture width, the open wall area, and the viewing route before choosing a position. A bedroom is seen from the bed, while an entryway is viewed while walking past, so the same canvas needs different treatment.
Use one tall canvas on the longest uninterrupted wall. Center it over the console or bench, then keep the lower edge close enough to connect with the furniture. A gap of 6 to 10 inches works above a low console or bench when the wall is narrow. Do not let the artwork appear suspended in empty space.
Keep the canvas no wider than roughly two-thirds of the console. Choose a subject with a strong vertical read, such as a restrained portrait, botanical stem, city skyline, or architectural photograph. A light wood frame suits a bright entry. A thin black frame gives a darker hallway sharper definition.
Above a low credenza or sofa, a pair of vertical canvases usually supplies better width than one slender piece. Center the complete arrangement on the furniture, not each canvas separately. Matching frames or a shared palette will make the pair read as one composition.
A single vertical canvas works beside a sofa when the room has ceilings above 9 feet, especially on a tall, narrow wall section between the sofa and an opening. Treat it as a flank, not the room's only centerpiece. A warm abstract or painting can connect with the upholstery without matching every cushion.
A stairwell needs art that follows the riser line. Hang the canvas so its visual axis tracks the angle of the stairs, and judge the height from the climbing route rather than from the lower floor. A portrait-oriented work suits a straight section. Related panels can echo the upward movement when the wall has enough length.
For more arrangements suited to this difficult zone, browse Jessie's Home's staircase wall art collection. Use lighter frames where daylight is limited, and avoid placing critical detail where viewers can only see it while passing.
Center one vertical canvas above the headboard. Keep its width between 50% and 66% of the headboard width, with roughly 4 to 6 inches of breathing room above the headboard. That proportion keeps the artwork connected to the bed instead of making it float above the room.
Choose calm subject matter, including muted botanicals, soft coastal scenes, or minimal abstracts. A slim natural frame works with warm bedding, while a frameless wrapped canvas keeps the arrangement quiet. In a small bedroom, a dark, heavily framed piece placed too near the ceiling compresses the wall and makes the room feel less restful.
Place the canvas behind or beside the desk, then test the camera view from the chair. A desk around standard working height can leave the artwork visible above the monitor, but a tall monitor or raised laptop stand may cover the lower half. Sit in the chair, open the video-call preview, and shift the canvas until your head does not block the focal area.
For example, on a narrow wall behind a desk, center the canvas on the desk zone rather than the entire wall. If the artwork sits directly behind your head, move it slightly toward the open side of the background. Leave enough clearance around the monitor, lamp, and shelving so the vertical shape remains readable on camera. The familiar 57 to 60 inch eye-level benchmark is a useful starting point for the artwork's center, but the seated sightline takes priority in an office.
Choose a vertical skyline, simple geometric abstract, or monochrome architectural piece. These subjects provide structure without competing with books, lighting, or shelving. In a dim office, a lighter palette and a frame with clear contrast will keep the artwork separate from the wall.
| Room | Best Wall | Width Rule | Center Height | Style Cue |
|---|---|---|---|---|
| Entryway | Longest uninterrupted wall | Up to roughly two-thirds of console width | Comfortable standing eye level | Clear subject, slim frame |
| Living room | Above furniture or beside sofa | Use the full arrangement to create width | Center on furniture grouping | Pair, warm abstract, or landscape |
| Stairwell | Wall following the stair path | Match the available wall section | Judge from the climbing route | Lighter frame, sequential subject |
| Bedroom | Above headboard | About half to two-thirds of headboard width | Close, calm relationship to bed | Muted palette, restrained frame |
| Office | Behind or beside desk | Fit the desk zone without crowding | Keep seated camera sightline open | Skyline, geometry, monochrome |
A vertical canvas should stay flat, level, and secure after installation. If it tilts forward, pulls away from the wall, or reaches the floor, the hardware was chosen poorly. Match the hanging system to the canvas weight and the wall material, not to the idea that it is “just décor.”
For a canvas under 10 pounds, use two D-rings set several inches below the top edge and connect them with picture wire rated for at least twice the artwork's weight. Two attachment points reduce twisting and make a tall piece easier to level. Use this setup only for light work.
For canvases from 10 to 25 pounds, choose heavy-duty D-rings or a French cleat. A French cleat spreads the load across the wall and keeps a larger piece level. Fasten it into two studs whenever possible. A single drywall fixing is a poor choice for a wide or tall frame.
For artwork over 25 pounds, or for a canvas taller than 36 inches, use a cleat system anchored into studs. A tall rectangle creates more pull on its upper hardware than its hand-held weight suggests. Ordinary drywall anchors can fail even when the frame feels manageable during lifting.
Installation rule: The taller the canvas, the less forgiving a weak attachment becomes.
Identify the wall before buying anchors. Drywall usually sounds hollow when tapped, while plaster feels harder and may show a denser, less flexible surface around an existing opening. Masonry feels solid and requires a masonry bit and compatible screw. A stud finder can confirm framing, but test carefully in an inconspicuous spot before committing to the final position.
Drywall, plaster, and masonry need different solutions. Plastic sleeve anchors suit lighter loads, self-drilling threaded anchors handle moderate loads, and toggle bolts provide stronger support for heavier installations. Check the manufacturer's rated capacity and leave a safety margin instead of working at the stated maximum.
Plaster can crumble around the wrong anchor. Masonry can crack or resist drilling when the bit is incorrect, so choose the hardware for the actual surface, not the visible paint finish.
For a methodical approach to alignment and placement, follow this precision picture hanging tutorial from Groen's Fine Furniture. It helps when a large canvas must sit level beside trim, shelving, or another artwork.
Mark the intended center with painter's tape. Calculate each hook position from the canvas center and its hanging point, then install the first nail or screw. Hang the canvas, step back to the doorway, and check the composition before adding the second attachment point.
Run a level across the top edge, then judge the piece against the furniture and surrounding lines. A canvas can be technically straight while still looking wrong beside sloped walls or crooked furniture. Add small rubber bumpers or felt pads near the lower corners, and leave about 1 inch of clearance behind the canvas where needed. This keeps the frame from tipping forward and protects the wall.
Vertical art doesn't automatically make a room feel taller. On a short wall beneath a low ceiling, a tall, dark canvas with a heavy frame can compress the space and make the ceiling feel closer. The format emphasizes the wall's height, but that isn't always the visual goal the room needs.
A wide sectional is the clearest example. One lone vertical canvas above it creates a narrow island in the middle of a broad furniture arrangement. A horizontal scene, oversized abstract, or grid of smaller works gives the sectional a wider visual base and makes the wall feel finished.
Above a sectional: Choose a horizontal canvas or a grouped grid. The arrangement should follow the sofa's long line instead of interrupting it with one narrow rectangle.
Along a long dining room wall: Use a series of horizontal pieces or a balanced gallery arrangement. Repeated width creates rhythm, especially when diners view the wall from several angles.
On a narrow wall opposite a window: Use one vertical canvas only when the wall is narrow and the artwork won't compete with reflected light. A pale subject and slim frame will usually behave better than a dark, glossy composition.
Grouped layouts can also make a broad wall feel taller and more curated than a single vertical canvas. A grid of squares, stacked horizontals, or a salon arrangement builds vertical movement through the spacing between pieces while still giving the wall enough width.
The contrarian answer: If you want the room to feel wider, don't choose vertical art just because the ceiling feels low.
Before you buy, measure both the wall width and the ceiling height. Then ask one blunt question: Do I want to emphasize height, or do I need to balance width? Choose the format that answers that question, not the format that looked most dramatic in the product listing.
A product photograph cannot show whether a canvas will arrive taut, whether its frame will stay square, or whether dark areas will look muddy in person. Read the specifications before you fall for the image.
Start with the canvas substrate and stretcher bars. Look for a quality cotton-blend canvas, straight solid-wood framing, clean corner construction, and an evenly taut surface. These details matter more than decorative marketing language. Inspect the edges from the side too. A gallery-wrapped finish should look intentional if you plan to display the piece without a frame.
Frame material affects how the work ages. Solid wood stretcher bars generally resist warping better than composite materials, especially when the room has changing moisture or temperature. Check that the frame is straight and that the corners meet cleanly before installation.
UV protection helps in rooms with daylight, but it does not make direct sun harmless. Keep valuable or highly saturated pieces away from strong, prolonged exposure. For printed canvas, confirm whether the inks are fade-resistant and whether the surface has a protective coating.
Shipping and returns deserve equal attention. Tall canvases can suffer corner dents or frame distortion during transit, so confirm how the seller handles damage before ordering. Keep the box until you have inspected the entire piece and tested it on the wall.
| Feature | Must-Have | Skip-It |
|---|---|---|
| Frame construction | Straight, sturdy wood stretcher bars | A frame described only with vague luxury language |
| Canvas surface | Taut, evenly wrapped canvas | Visible ripples, loose corners, or soft edges |
| Print clarity | Crisp detail suited to the viewing distance | A low-resolution image enlarged beyond its limits |
| UV protection | Protective coating for rooms with daylight | Treating UV coating as permission for direct sun |
| Edge finish | Clean gallery wrap or a frame that suits the room | An unfinished side visible from normal viewing angles |
| Shipping policy | Clear damage replacement and return terms | A final-sale policy with no inspection window |
Dust with a clean, soft microfiber cloth or a very soft brush. Never spray household cleaner onto the canvas, and do not press hard against the surface. Moisture, heat, and unstable conditions can contribute to warping, so keep the piece away from bathrooms with heavy condensation, radiators, and damp exterior walls.
Check the canvas from the side occasionally. Watch for a loose surface, a corner pulling away, a frame that no longer sits square, or color changes in areas exposed to light. Repairing a loose hanging system early is far easier than repairing a canvas after it falls.
If you are moving, protect the face with clean, non-abrasive material, keep the artwork upright when practical, and avoid stacking heavy boxes against it. TLC Moving & Storage's packing help for artwork provides a useful reference for protecting canvases during transport.
For artwork requiring a specific height, subject, or proportion, Jessie's Home's custom canvas wall art collection offers made-to-fit options, so you are not forcing an undersized stock canvas onto the wrong wall.
Choose the wall before choosing the canvas. Jessie's Home offers artist-made canvas wall art and gallery-quality photo prints in portrait, abstract, botanical, skyline, and other styles, produced on premium canvas and finished for ready-to-hang display. Visit Jessie's Home to find a vertical work that fits your wall's proportions, not merely your saved-image folder.

Discover how black and white minimalist art transforms any room with calm, contrast, and timeless style, plus tips on prints, framing, and placement.
Discover how black and white minimalist art transforms any room with calm, contrast, and timeless style, plus tips on prints, framing, and placement.

Discover watercolor abstract art techniques, learn how prints differ from originals, and get styling tips for your home. A complete guide for wall art lovers.
Discover watercolor abstract art techniques, learn how prints differ from originals, and get styling tips for your home. A complete guide for wall art lovers.

Explore the beauty of modern landscape art and how to choose prints that transform your home. From trends to room-by-room styling tips, this guide covers it
Explore the beauty of modern landscape art and how to choose prints that transform your home. From trends to room-by-room styling tips, this guide covers it


